
Routine bike maintenance
Published 2024-01-21
We have (about) 10 bikes in our garage, five to seven of which will get ridden during any given week (when we aren’t icebound, anyway). Most of these bikes are well-loved (chipped/scuffed/rusty) budget cyclocross bikes, 5–10 years old, aluminum or steel frames. They are not especially fancy or expensive. There is also one 20-year-old carbon fiber road bike that gets weekly commuter miles.
For all five of us, for all our commutes, and with our extracurricular rides, we average 300–400 collective miles/week on these bikes, in (almost) all weather, on city streets and paths, and occasionally gravel roads, goat paths, or nontechnical forest trails. Our five daily rigs also have full fenders.
I am (mostly) the only person who maintains our family rigs.
Daily(ish)
If anyone has a rusty chain, I quickly lube it (see below).
I squeeze everyone’s tires for pressure. If anyone has a flat tire, I fix it (see below).
I recharge everyone’s headlights and tail lights.
This takes only a few minutes every evening. It’s often the last thing I do before locking up the garage and house for the night.
Every week
On weekends, generally on Sunday afternoons, I work through all the bikes that have been ridden during the week, with the following routine. If we have cyclocross races on a given weekend, that bike might get this attention before and after the race. The weekly routine generally takes 1–3 hours for all the bikes in the garage, depending heavily on the weather. For any given bike:
Clean
If the bike has any more dirt on it than dust or light road grime, I wash it. This is not so much about keeping a bike pretty as it is about keeping it easy to work with, and inspecting it for funny behavior. Clean bikes easily betray problems that grunge might hide or silence. Clean bikes also attract less dirt, so the more often I clean a bike, the easier it is to clean again. It generally takes less than 10 minutes to clean a bike moderately well — even a really muddy bike after a trail ride or cyclocross race — if I do it regularly.
I wash the bikes on a work stand next to the garage, using warm water in a 5-gallon bucket and generous amounts of generic dish soap. I use a large soft brush (like this one) on 95% of the bike. I pay special attention to the brake pads and rims. I use a specialized cogset brush (like this one) to floss out the cogset and chainring; and to clear gunk off the derailleur pulleys. I also get unreasonable satisfaction from clearing gunk off chainrings and pulleys with my fingernails.
I clean the chain with a cellulose sponge and dish soap (synthetic sponges tend to fall apart quickly when exposed to this routine). I might add a little degreaser like Simple Green if it’s especially dirty.
I rinse the whole bike thoroughly with very gentle water pressure, until all the gray or soapy water runs clear.
If I have time & weather allows, I let the bike air dry.
Every few months, especially in dry weather, I polish the frame.
Lube
I lube the chain (generally with Tri-flow). I squirt a little lube onto a piece of a heavy plastic bag about 6" on a side — freezer bags are about the right weight. I apply the lube to the chain via this piece of plastic. I make a fist with the plastic around the chain, greasy side against the chain, while I backpedal through it 20–30 times, pausing occasionally to add another drop or two of lube. I do this until there is no visible rust on the chain (keeping in mind that some alloys produce white or gray rust). This method is much cleaner and uses much less lube than applying lube directly onto the chain.
Then I grab a rag (old t-shirts work well) and grip it lightly around the chain & backpedal through that. I shift the rag occasionally to keep passing the chain through clean cloth. Depending on how dirty or rusty the chain is, I might repeat this process. I might also work through the chain link-by-link with the rag and wipe off all the stickiest grunge. By this point the chain should look shiny (not black) and feel almost dry. In wet weather I add one more light coat of lube.
Bike people have Many Opinions about lube. Mine is that grit is worse than rust for a chain. Tri-flow is cheap and just tenacious enough to withstand a day or two of rain, but not so tenacious as to attract a lot of grime. That said, it ain’t perfect. Unlike silicone based lubes it will attract grime, yet a good dunking will still leave you with a rusty chain. For commuter rigs like ours, a rusty chain is no problem if you relube it right away
I use a chain checker to measure chain wear. In general I change any given chain two or three times/year. I have learned the hard way that trying to save $30 on a chain is a great way to lose $150 on a cassette.
Then I use the capillary straw on a bottle of tri-flow to hit a few other spots with tiny drops of lube:
- each pivot on a derailleur
- brake pivots (taking care not to let the lube touch the brake pad)
- where exposed cables pass into cable housing
- springs on clipless pedal cleats
- around the bushings on derailleur pulleys
I shift through all the gears and work the brakes to ensure the lube works into every pivot.
I check all the bearings for play or resistance. Sometimes I might try to resolve those issues myself (generally by cleaning & repacking bearings with Phil Wood grease) but in the past few years I am more likely to take it to the shop.
Tune
This is where having clean bikes really pays off. I do very little tuning other than tightening brakes as pads wear out. Derailleur and brake tuning varies a lot by bike so I won’t go into great detail. But on every bike I check that:
- brakes bring wheels to a full stop without bottoming out…
- …but with enough range of motion to provide good stopping leverage
- brake pads have plenty of wear remaining
- chain passes cleanly into/out of every gear
- derailleur doesn’t skip, especially in the middle gears
Tires
I fill each tire to its best pressure. For clinchers, we run between 50PSI (40mm tires) and 90PSI (25mm tires). I’m the only one riding tubeless, which I generally keep 30–50PSI for street riding. I have a good intuitive sense for what these pressures feel like under my fingers, but at least once a week I use the floor pump (with its accurate gauge) to make sure we are at the right pressure. Our best floor pump has a secondary reservoir (for seating tubeless tires). I leave this reservoir filled at ~60–80PSI, so simply hooking up the pump & opening the reservoir tends to top everyone off, at the same time as I’m checking pressure.
If we noticed a slow leak on a bike during the week, I’ll take that tube out and check it more closely. Sometimes this means passing it through a bucket full of water, looking for bubbles, then patching it. But I am getting richer and lazier, so if I notice a slow leak these days I’m more likely just to put in a new tube.
For the bikes with tubeless tires, I give them a spin and listen closely for the sealant sloshing as the tire slows. If I can’t hear any, I will remove the valve core and add 2-4oz of sealant. After I switched to cheaper tubeless tires, they have become almost maintenance free. It seems the most expensive tires (hint: the ad copy reads “supple”) are the most prone to punctures that must be plugged.
Irregularly
In my younger, simpler days I did all our bike maintenance, which is how I built our bike toolbox. (Every time I needed something weird like a crankset puller or chain whip, I would buy exactly that tool.) As I get older/busier/richer, and as our bikes get more complicated, I am more likely to take bikes to the shop for maintenance. The following is a non-exhaustive list of projects I am likely to take on, in probably the order of likelihood that I will do it myself:
- Replace brake pads (1–3×/yr/bike)
- Replace chains (2–4×/yr/bike)
- Take off/put on fenders (? maybe 3–6×/yr for all bikes)
- Repack loose bearings (< 2–3×/yr for all bikes)
- Replace cables (1×/yr/bike)
- Replace cables and housing (1×/yr/bike)
- Replace cables and housing and bar tape (< 1×/yr/bike)
- True wheels (1 – 2×/yr for all bikes)
- Replace bearing cartridges (< 1×/yr for all bikes)
The unexpected
The most common on-the-bike maintenance situations are (in descending order of likelihood):
- Dropped chain
- Wedged chain
- Flat tire
- Randomly adjusting something like a loose fender, or saddle height
Keeping bikes clean and tuned minimizes chain issues, but they still happen, especially if you’re a kid who grinds away every mile in your top gear. There is no special tool to carry for this, you just use your hands and knowledge of how derailleurs work to finesse the chain back to where it should be.
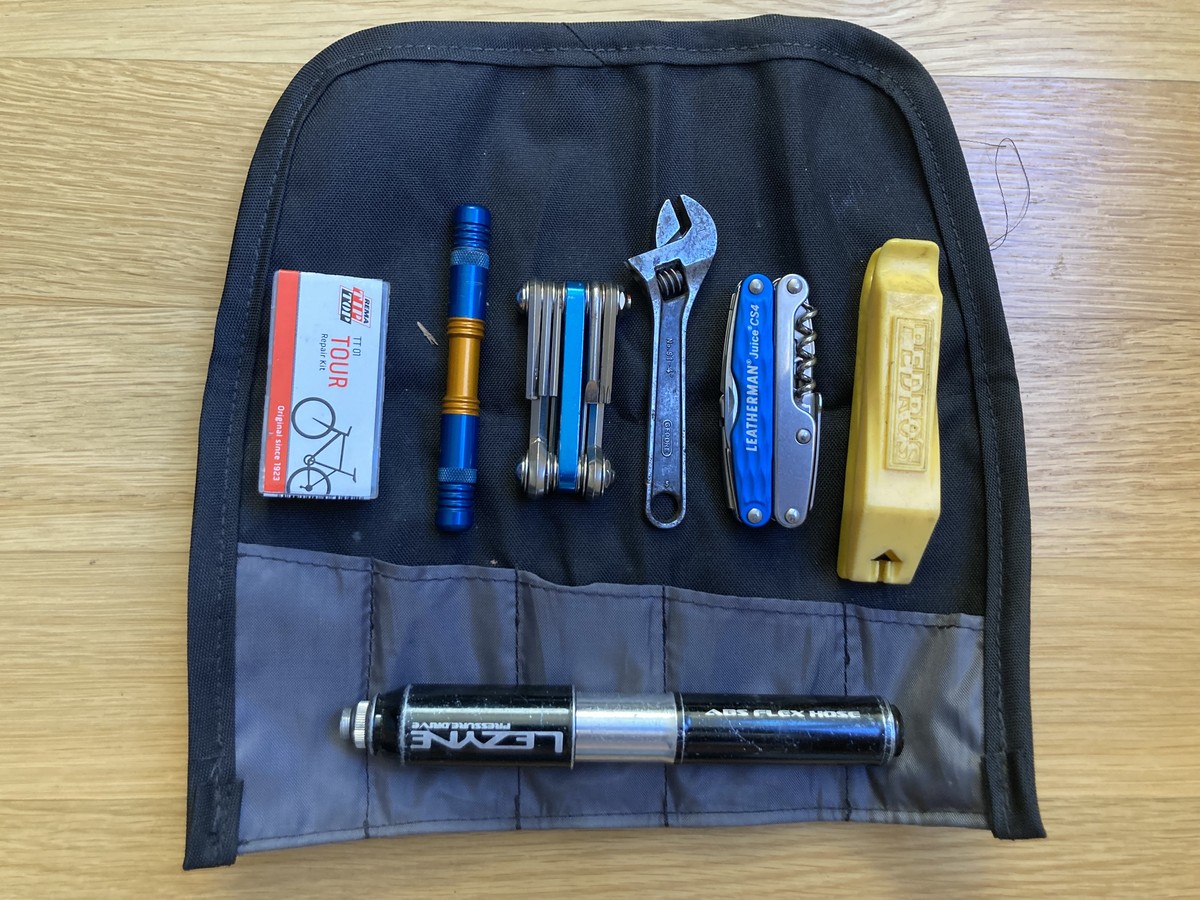
For everything else, we all carry a minimal toolkit to deal with on-the-bike situations:
- Tire levers
- Patch kit
- Spare tube
- Mini-pump
- Small multitool
Note about mini-pumps
There is something about this product category that just begs for failure. If they’re small enough to carry, they are (generally) too small to require less than a couple hundred pumps — and they might be so cheaply built that they break during use! Frame pumps work great but don’t fit in a backpack. For my money — and more importantly, for my family — I have never found better mini-pumps thanTopeak morph pumps. In fact, I still have the Road Morph I took with me on my tour down the Oregon coast in 2002 — which was for years my only bike pump. It is good enough to use like a regular floor pump. I also have a Lezyne Pressure Drive. This is fussier to use than the Morph (it must be threaded onto the valve), and it has a smaller chamber so it takes 100+ pumps to get you to a decent pressure. But it is very reliable, and solidly built.
I am not a fan of CO2 cartridge inflators, sheesh don’t get me started.
Note about multitools
This is another product category with a dizzying array of innovative junk. As a rule, anything with a built-in chain tool will be too fat to maneuver easily. I love my Topeak Alien I, which also traveled down the Oregon coast with me 22 years ago…but it lacks a Torx wrench which is necessary for modern bikes. The best compromise is a 9- to 12-function multitool which is mostly a set of boring old hex keys (2.5 to 8mm) + T25 and a screwdriver. Simpler is better.
Note about patch kits
I use the kind with glue. I have at times used the glueless kind, to mixed results. I find the glue is a little more tricky but also more reliable, with one caveat: once the tube of glue has been opened, it will eventually evaporate. No matter how tightly I reseal it. It will generally take a couple of months for this to happen. I have gotten into the habit of carrying a spare (unopened) tube of glue with me. Most bike shops will sell you just the glue so you don’t need to buy a second patch kit.
In addition to the stuff above, and especially on longer solo rides, I might also carry:
- Tubeless plugs
- Spare chain link pins or master links
- A multitool with small pliers, like a Leatherman
- 6" adjustable wrench that can open to at least 15mm (for pedals)
- a small chain tool
- spoke wrench
Everyone in the family has had lessons in how to remove a tube and patch a flat, and they have certainly all seen me do it a zillion times. Sometimes they even attempt to do so themselves, but generally when there’s a flat tire they rely on a nearby friend, or call me for a rescue pickup.
I might write a followup to this post on how to practice changing and patching tire.